Creating a crypto token is now easier than ever. Thanks to no-code platforms and the scalability of Core Blockchain, anyone can create token on Core where no coding required. With tools like DeployTokens.com, you can launch your digital asset quickly and securely, whether it’s for a dApp, community, or experimental project.
Core is a modern, EVM-compatible blockchain designed for security, scalability, and performance. Combined with DeployTokens, a user-friendly platform that abstracts away the complexities of smart contract development, it opens the door for creators, builders, and entrepreneurs to easily launch tokens with real functionality. Whether your goal is to power a decentralized finance (DeFi) product, create a utility token for your community, or experiment with governance structures, DeployTokens makes the process seamless. You don’t need to download software, set up a development environment, or write a single line of Solidity code.
In this guide, you’ll learn how to create token on Core Blockchain from start to finish. We’ll cover everything from setting up your wallet and selecting Core as your network, to customizing token properties and enabling optional features like minting, burning, pausing, and transaction tax. By the end, you’ll have a fully deployed token, ready to test, share, or integrate into your project.
How to Create Token on Core Blockchain
Creating your own token on Core Blockchain no longer requires deep technical skills or hours of coding. Whether you’re launching a governance token for your DAO, designing a utility asset for your app, or simply testing a concept, the process can now be completed in minutes—entirely through a no-code interface. Here’s a detailed walkthrough to help you bring your Core-based token to life from idea to deployment.
Step 1: Visit DeployTokens
Step 2: Connect Your Wallet
Step 3: Enter Your Token Details
Step 4: Launch Your Token on Core
Step 1: Visit DeployTokens.com
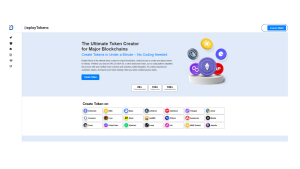
Start by heading over to DeployTokens, This no-code platform is purpose-built for creating and deploying tokens across multiple EVM-compatible blockchains including Core.
You don’t need any programming knowledge, command-line tools, or smart contract experience. The interface is simple, clean, and easy to navigate, making it ideal for both crypto veterans and newcomers. All you need is a browser and a compatible crypto wallet.—learn more in this guide.
Once on the homepage, you’ll see options to start the token creation process right away. Everything happens in a secure, decentralized manner with smart contracts deployed directly to your wallet.
Step 2: Connect Your Wallet
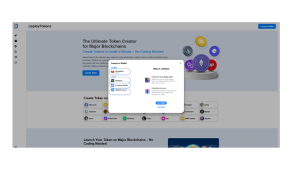
To proceed, you’ll need to connect a Web3 wallet so DeployTokens can interact with the Core Blockchain on your behalf.
Here’s how:
-
Click the “Connect Wallet” button in the top-right corner of the site.
-
Choose your preferred wallet provider—MetaMask is the most widely used and recommended for Core.
-
Approve the connection request and make sure your wallet is unlocked.
After connecting, ensure your wallet is set to the Core mainnet. If you’re not on the correct network, DeployTokens will prompt you to switch automatically. This connection lets you approve transactions securely without exposing private keys—see Ethereum vs. Binance Smart Chain for network-switching tips.
This connection is crucial it allows you to initiate and approve token deployment transactions without exposing your private keys or needing backend access.
Step 3: Enter Your Token Details
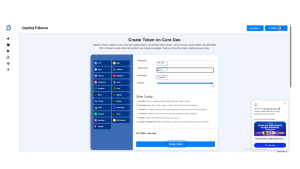
After connecting your wallet to DeployTokens, you’ll begin the token configuration phase. This is where you define how your token behaves on the Core network.
Here’s what you’ll need to fill out:
-
Token Name – This is the full name of your token (e.g., “My Core”).
-
Symbol – A short, uppercase ticker for your token (e.g., “MYC”).
-
Total Supply – The maximum number of tokens that will exist at launch.
-
Decimals – Typically set to 18, which allows for fine-grained token divisions.
-
Initial Allocation Plan – While this is off-chain, it’s good practice to define how you intend to distribute tokens (e.g., 40% community, 20% team, 10% for staking). —see How to Plan and Design Your Token.
You can also customize advanced features to match your vision:
-
Mintable – Allows you (or a designated role) to create more tokens post-launch.
-
Burnable – Lets holders destroy tokens, helping enable deflationary models or tokenomics.
-
Pausable – Gives you control to temporarily halt all transfers if needed—key for security.
-
Blacklist – Prevent specific addresses from sending or receiving tokens.
-
Transaction Tax – Automate a fee from each transfer to a treasury wallet.
-
Supply Cap – Set a hard limit on how many tokens can ever be minted.
Each of these options enhances your ability to model real-world economics, governance mechanisms, or reward systems—explore more in Choosing the Right Token Standard.
Step 4: Launch Your Token on Core
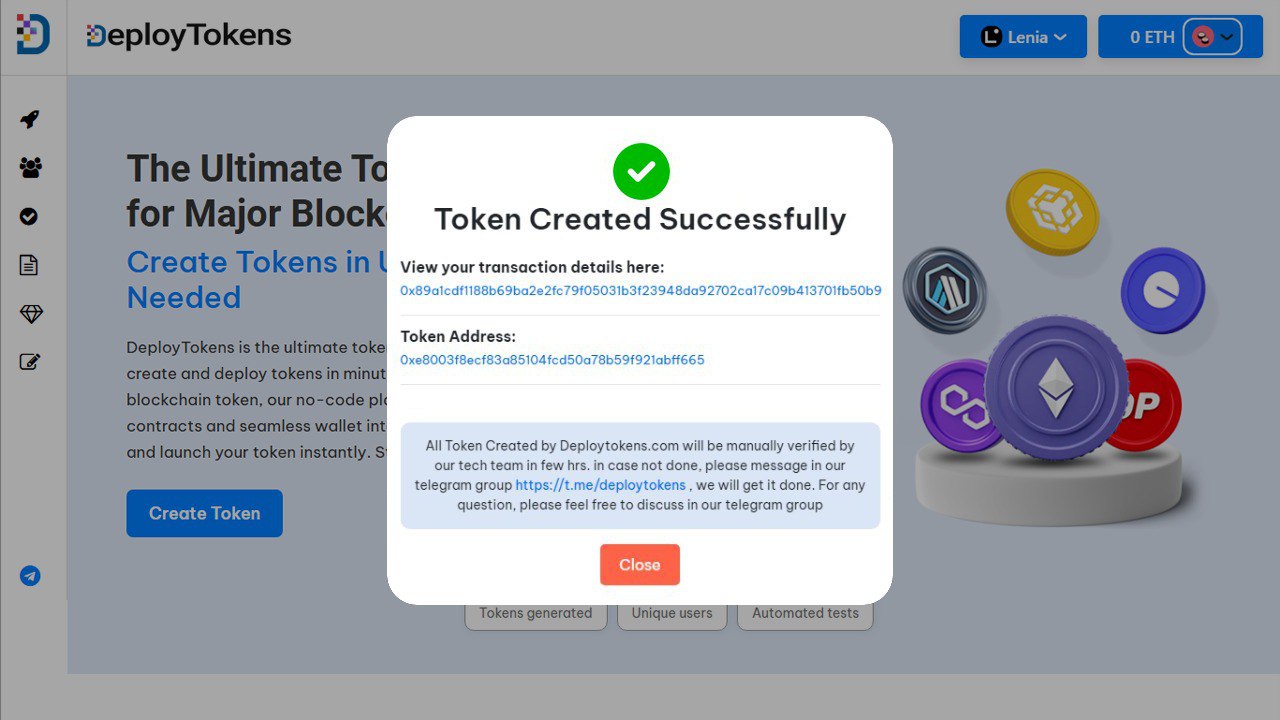
Once everything is set, click the “Create Token” button. You’ll be prompted to approve a transaction via your wallet (such as MetaMask).
DeployTokens will automatically:
-
Generate your smart contract
-
Create Token on Core Blockchain
-
Verify the contract for public transparency
Your token is live within minutes, your token will be live. You’ll receive a contract address and can immediately interact with it—whether that means testing transfers, importing it into your wallet, or sharing it with collaborators. That’s how you have create token on core blockchain without writing a single line of code and verify it effortlessly. —Try a test airdrop to distribute it.
There’s no need to manually verify the contract on CoreScan or troubleshoot deployment issues. The platform handles everything for you.
Real-World Use Cases After You Create Token on Core
When you create a token on Core, you unlock powerful utilities across a wide range of blockchain applications. Here’s how your Core-based token can be used in real-world scenarios:
1. Utility Token: After you create a token on Core, it can be used as a utility token to grant access to specific features or services within your app. Whether it’s unlocking premium tools, paying for storage, or enabling advanced API access, utility tokens help power your product ecosystem.
2. Governance Token: If you’re building a decentralized platform or DAO, creating a governance token on Core gives your community voting power. Token holders can propose and vote on key decisions—making your project more democratic and transparent.
3. Reward Token: Use your Core token to incentivize user behavior. Reward active users, stakers, or contributors with your token to build loyalty and engagement. This model works well in DeFi, Web3 communities, and play-to-earn games.
4. Payment Token: A token created on Core can serve as a native payment method inside your dApp. Enable seamless peer-to-peer transactions, in-app purchases, or marketplace exchanges—all powered by your own digital currency.
FAQs About Core Token Creation
How to create token on Core?
Follow the 4-step process above using DeployTokens.com
Step 1: Visit DeployTokens
Step 2: Connect Your Wallet
Step 3: Enter Your Token Details
Step 4: Launch Your Token on Core
What is a Core token?
A token deployed on the Core Blockchain that can serve various purposes payments, governance, staking, and more. See What is ERC-20?
How much is 1 Core right now?
Prices fluctuate. Check live Core token prices on exchanges or CoinMarketCap.
Is Core wallet safe?
Yes, use official wallets and enable 2FA for extra security.
Is it free to create token on Core?
Deploying on Core involves minimal fees often just the blockchain gas cost.